

In the early days, many believed that climbing gyms were just a passing fad. They might survive a few years, maybe five. People reasoned that once the novelty wore off and enthusiasts moved on to the next new thing, there wouldn’t be enough climbers to support the business, much less keep it growing. In retrospect, we was completely wrong.
The idea of constructing a wooden cliff inside a warehouse and then charging people to come and climb there did not spring fully formed from the mind of a deranged dirt-bagging entrepreneur. The first commercial climbing gyms owe their existence to the ingenuity and engineering skills of a few resourceful climbers from the 1970s and 80s seeking ways to stay in shape during the off-season. So, at least in the U.S., the first artificial walls weren’t built in old warehouses or shopping districts by professional climbing wall companies. Instead, they were erected in basements, backyards, attics, and garages by underemployed climbing enthusiasts with the assistance of loyal friends–and power tools.
These early walls, or ‘woodies’ (yes, that’s what they were called, with a straight face), were constructed much like a wall in your house, albeit with a few more odd angles and three-foot roof features than your typical living room. The preferred method involved using plywood sheets screwed onto a wooden frame, which was then tied back, often haphazardly, to whatever exposed beams or concrete you could reach in your basement or garage. A few ambitious and occasionally skilled climbers even went as far as building free-standing walls in their backyards, sinking posts into the ground and hanging their frames off these, rather than risking the structural integrity of their houses (or rental units).
The vast majority of these were bouldering walls, designed to help climbers build power and a bit of endurance during the off-season. The truth was, they weren’t that difficult to build. Almost anyone with a few hundred dollars, some power tools, and a vague notion of carpentry could put up a woody in a week.
The problem was, in the beginning, where could you get some holds? Historically, climbers have always been an independent and industrious tribe. They were quite accustomed to solving challenging and complicated problems in high-stress situations, often hundreds of feet in the air. Figuring out how to invent artificial climbing holds while standing safely on the ground was a walk in the park by comparison.
The first holds came in two flavors: wood and rock. Wooden holds had several advantages: they were inexpensive to make, easy to customize, and simple to attach to the wall. Just grab a few screws and a powered screwdriver, and you were ready to go. On the other hand, rock holds presented a greater challenge. The earliest of these were exactly as the name implies—rocks found outdoors on the ground or along streambeds, chosen to mimic the hold types and texture of your favorite climbing area. They were easy to find, cost-effective, and had the added advantage of not requiring any woodworking skills to shape. Need a crimp? Just pick one up off the ground!
Real rock holds did have one significant drawback compared to shaped wooden holds—you couldn’t simply screw them to the wall. To overcome this challenge, climbers turned to bolts. The solution involved drilling a hole in the wall, another in your chosen rock, and fastening the two together using a 3/8-inch nut and bolt, along with your trusty adjustable wrench. Repeat this process fifty or a hundred times (depending on your patience and access to free stone), and “Voilà!” you’ve got yourself a woody!
The only drawback was that it required two people—one in front and one behind the wall—to put up holds or change the wall. It was an inefficient and time-consuming process. Sometime early on, someone figured there had to be a better way.
If you ask a climber what the most influential invention in the history of our sport would be, you are likely to get one of a handful of answers. Some would say it was the invention of dynamic, kernmantle ropes, which allowed climbers to take longer falls on harder routes without fear of damaging their backs or harnesses like static ropes. Others might choose active cams, chalk, or sticky rubber. However, in the realm of the indoor climbing gym, it’s clear that a single insight transformed what was formerly a time-consuming labor of love into a viable, scalable training solution. That insight was a tiny piece of unremarkable hardware called a ‘T-nut.’ Before I entered my first climbing gym, I had never even heard of a T-nut. And, in the thirty years since, I have only seen it used outside of the climbing industry a handful of times, usually on furniture one might order from Ikea.
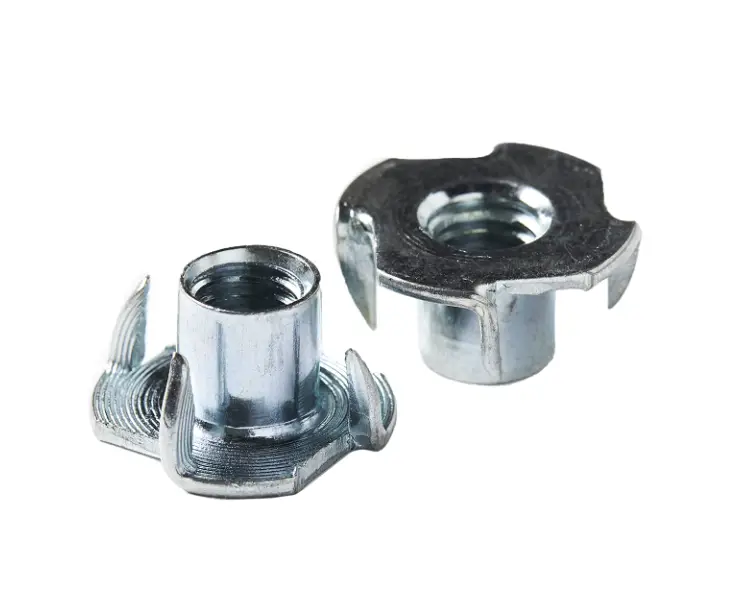
A T-nut is a nut designed to thread onto a bolt to secure it. However, unlike a typical nut that must be spun onto the shaft of a bolt, a T-nut is embedded in the plywood of a climbing wall, awaiting a bolt to be threaded into it and tightened down. Thus, instead of needing one nut for every bolt you wished to place in your wall, you only required one T-nut for every hole in the wall where you might potentially want to position your holds.
This was a game-changer. It meant you no longer needed to crawl behind your wall to set or remove holds. One person with a wrench could now move holds around whenever and wherever they wanted with ease, as long as there was a free T-nut available. Arguably, this single idea made indoor climbing possible—or at least practical. Not only did it set the stage for the development of modern route-setting by enabling one person (rather than two or three) to do the work, but it also established a default standard for creating something equally significant…
Holds.
With T-nuts in place, climbers could now experiment with various methods and materials for creating artificial holds. Some stuck with traditional materials like wood and rock (for instance, one of the first commercial hold manufacturers, Petrogrips, exclusively sold real rock holds sourced from Pennsylvania stream beds). Others explored more modern materials, including ceramic, epoxies, and even Bondo. In fact, for over a decade, climbing magazines featured tutorials on how to shape and make your own holds at home using items from your local hardware store—resulting in holds of varying degrees of quality, simplicity, and toxicity.
After much experimentation, the consensus settled on plastic resin as the most economical and versatile material for crafting holds. Make a mold, pour your resin, let it set, and “Poof!” You have a hold. Drill a hole in the center, grab a bolt, and it’s ready for your wall.
The indoor climbing industry was born!
It’s strange to think back on it now, but all the pieces that made the first PRG possible had only come together a few years before we showed up at that old warehouse to see it being built. At the time, there were only a few climbing wall companies in the world, and nearly all of them were in Europe. This put the cost of such walls well beyond the meager resources of the average budding climbing entrepreneur.
As a result, most of the early gyms in the U.S. were not built by professional wall builders. In fact, often, they weren’t built by professionals at all. The original PRG fit right into this category. To be fair, the original construction crew did include a professional carpenter.
But it also included a steelworker, though there was little steel in the original build, two recent college graduates in business and communications (the owners), and a rotating crew of friends and family (which varied depending on who had time off) who had a head for heights and the strength to swing a hammer.
And, after we showed up for that first visit, it included a small group of enthusiastic, if unskilled, volunteers who just wanted to see this crazy idea become reality.
Throughout the following few months, each of us, along with a handful of other locals, stopped by the gym on our days off to pitch in and lend a hand. For the most part, we tackled the grunt work so that others with more expertise could focus on the crucial task of ensuring the structural integrity of the walls. We took out the trash, moved lumber around, or pounded thousands of T-nuts into dozens of sheets of plywood. It truly became a community effort.
Six days a week, twelve to sixteen hours a day, somebody was always working at the gym, drilling holes, tacking up plywood, tweaking the layout to accommodate all the random bits of a warehouse that was most definitely not designed with this use in mind. In the evenings, once everyone was too exhausted even to pick up a wrench, we would all stop and open the beers. Then we would hang out and do what climbers are almost as famous for as fishermen – bullshit. We would tell tall tales of the routes we had sent or nearly died on, the “famous” climbers we had met at the crag, or sandbag each other on our favorite routes, always claiming our proudest sends were harder than they were – and that our friends’ were easier. So it was that, after a few short months and about $100K, the Philadelphia Rock Gym in Oaks, PA, was ready to be open to the public at the beginning of February 1994.
They truly don’t build gyms like that anymore.
All material is reprinted with the permission of the author. Copyright 2022 David H. Rowland. All rights reserved.